
How To Add PS1 Bios To Retroarch (Practical Guide)
Quick Answer: To add PS1 BIOS to RetroArch, download the required BIOS files (scph5500.bin, scph5501.bin, scph5502.bin), then copy them to your RetroArch system folder found in Settings → Directory → System/BIOS. Install the PCSX ReARMed core, and you’re ready to play PlayStation games!
What You’ll Learn
- Which PS1 BIOS files you actually need
- How to locate your RetroArch system folder
- Step-by-step BIOS installation process
- Troubleshooting common BIOS issues
- Best PS1 core recommendations for 2025
- Performance optimization tips
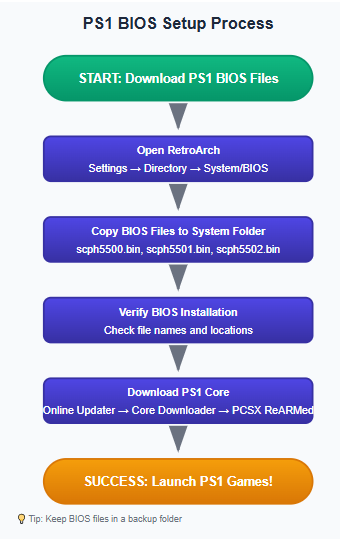
Setup Process Overview
Required PS1 BIOS Files
Here’s what you need to know about PlayStation BIOS files. Don’t worry – it’s simpler than it looks!
| BIOS File | Region | Size | Priority |
|---|---|---|---|
| scph5500.bin | Japan (NTSC-J) | 512 KB | High |
| scph5501.bin | USA (NTSC-U) | 512 KB | Recommended |
| scph5502.bin | Europe (PAL) | 512 KB | Optional |
Pro Tip: You technically only need one BIOS file, but having all three ensures maximum game compatibility. The PCSX ReARMed core will automatically choose the best one for each game.
Note: For Downloading Bios File you visit our homepage all working file link available.
Step-by-Step Installation Guide
Step 1: Download PS1 BIOS Files
First things first – you’ll need to obtain the PlayStation BIOS files. Now, I can’t tell you exactly where to get these (legal reasons and all), but they should come from your own PlayStation console if you want to stay on the right side of copyright law.
Important: Make sure your BIOS files are exactly 512 KB in size. If they’re different, they might not work properly.
Step 2: Open RetroArch and Find Your System Folder
This is where things get interesting. RetroArch keeps all its BIOS files in what’s called the “system” folder, but finding it isn’t always obvious.
- Launch RetroArch
- Navigate to Settings
- Go to Directory
- Select System/BIOS
- Look at the path shown on the right side – that’s your system folder!
Common locations:
- Windows:
C:\Users\[Username]\AppData\Roaming\RetroArch\system\ - Linux:
~/.config/retroarch/system/ - macOS:
~/Library/Application Support/RetroArch/system/
Step 3: Copy BIOS Files to System Folder
Now comes the easy part. Simply copy your PS1 BIOS files directly into the system folder you just found. No subfolders needed – just drop them right in there.
Double-check: Make sure the file names are exactly as shown in the table above. RetroArch is picky about this!
Step 4: Install the PCSX ReARMed Core
You’ll need a PlayStation emulator core to actually run the games. PCSX ReARMed is the most popular choice for good reason – it’s fast, compatible, and works great on most devices.
- In RetroArch, go to Main Menu
- Select Online Updater
- Choose Core Downloader
- Find and download Sony – PlayStation (PCSX ReARMed)
Step 5: Test Your Setup
Time for the moment of truth! Let’s make sure everything is working properly.
- Load a PS1 game (ISO, BIN/CUE, or PBP format)
- Select the PCSX ReARMed core when prompted
- If the game boots up, congratulations – you did it!
Still getting BIOS errors? Check the troubleshooting section below – we’ve got you covered!
Troubleshooting Common Issues
❌ “No PlayStation BIOS found” Error
This is the most common issue, and it’s usually a simple fix:
- Double-check that your BIOS files are in the correct system folder
- Verify the file names are exactly correct (case-sensitive on some systems)
- Make sure the files are 512 KB in size
- Try restarting RetroArch after copying the files
⚠️ Games Boot But Have Issues
If games start but don’t run properly:
- Try a different BIOS file (some games prefer specific regions)
- Check if your game file is corrupted
- Adjust core options in the Quick Menu
- Consider using the Beetle PSX core for better accuracy
💡 Performance Issues
If games run slowly or have audio problems:
- Enable “Threaded Rendering” in core options
- Try different audio drivers in RetroArch settings
- Reduce internal resolution if using enhanced graphics
- Disable rewind feature for better performance
Frequently Asked Questions
Do I need all three BIOS files?
Technically, no. You can get by with just one BIOS file (scph5501.bin is the most commonly used). However, having all three ensures maximum compatibility since some games work better with specific regional BIOS files. It’s like having a Swiss Army knife instead of just a regular knife – you’re prepared for anything!
Can I use RetroArch without BIOS files?
RetroArch will fall back to something called High-Level Emulation (HLE) if no BIOS is found, but honestly? It’s not great. You’ll run into compatibility issues, memory card problems, and some games just won’t work at all. Trust me, it’s worth taking the time to set up proper BIOS files.
Which PS1 core should I use in 2025?
For most people, PCSX ReARMed is the sweet spot. It’s fast, compatible, and works well on lower-end hardware. If you have a powerful computer and want the absolute best accuracy, Beetle PSX HW is worth considering, but it’s much more demanding. SwanStation is another solid option that sits somewhere in between.
Why do my multi-disc games not work properly?
Multi-disc games need special handling. Create an M3U playlist file that lists all the disc images, or convert your games to PBP format which can contain multiple discs in a single file. RetroArch’s disc control feature makes swapping discs much easier this way.
Is it legal to download PS1 BIOS files?
This is where things get tricky. Technically, you should only use BIOS files that you’ve extracted from your own PlayStation console. Downloading them from the internet is a legal gray area at best. I always recommend doing things the right way – it’s not that hard to extract BIOS files from your own console if you have one.
Performance Optimization Tips
Speed Improvements
- • Enable threaded rendering
- • Use dynamic recompiler
- • Disable unnecessary visual enhancements
- • Try different audio drivers
- • Reduce internal resolution
Quality Improvements
- • Enable enhanced resolution (if powerful enough)
- • Use PGXP for better 3D accuracy
- • Apply appropriate shaders
- • Enable dithering for authentic look
- • Configure aspect ratio correctly
You’re All Set!
Setting up PS1 BIOS files in RetroArch might seem daunting at first, but it’s really just a matter of getting the right files in the right place. Once you’ve got everything configured, you’ll have access to one of the greatest gaming libraries ever created. From Final Fantasy VII to Metal Gear Solid, Crash Bandicoot to Gran Turismo – the PlayStation’s catalog is absolutely legendary.
Remember, emulation is all about preserving gaming history. Take your time, follow the steps carefully, and don’t hesitate to experiment with different settings to get the perfect experience for each game. Happy gaming!
